It's only two weeks into 2018, and we've had at least three seasons it seems! Cold (12 degrees), not so cold (70), now snow and ice (ugh, no NYT delivery).....at least not being able to get out and about has given me a good excuse to blog.
There's lots of sewing to do, too. Graduation dresses are in the works. Carnival suit is in progress. For Christmas gifts (as yet, undelivered) I made several microwave bowl cozies. I love mine so much I found directions on Youtube--Thank you, Karen--then dug through my resource center for coordinating fabrics and batting, and whipped them out. And I have received the parts from collaborating artist, Catherine Stevens, to create the pieces for the show in April. That is VERY exciting and I will post more on that later.
Since I've got an early start on the dresses and suits, I will have time to work in the garden before the REAL summer season begins. Who knows when that humidity bomb will drop??!!!
Showing posts with label grad dress. Show all posts
Showing posts with label grad dress. Show all posts
Saturday, January 13, 2018
Tuesday, August 2, 2011
Verklempt
The bride and her mother picked up the wedding dress today and I teared up a tiny bit. That beautiful garment has been a constant companion all summer and now she's gone and I miss her.
In the meantime I finished one of the art quilts that was banging around in my head and need to hang it in a place where I can see it daily. I am trying to use this series of wall hangings as visual reminders in an effort to balance myself. (ooo that sounds a little too self aware.)
Of course I have taken plenty of photos of the things I've been doing lately and when I get them ALL downloaded and organized, I'll post them. I still haven't completed the series on the graduation dresses, so please do not hold your breath.
Tuesday, June 14, 2011
Where we left off....
 |
| positioning template for curved band |
 |
| pin marking center of horizontal band; blue marker |
 |
| blue dots for guide |
 |
| longer edge stitched |
 | |||
| miter corners before stitching |
Of course the photos came up first and I don't know how to change them.
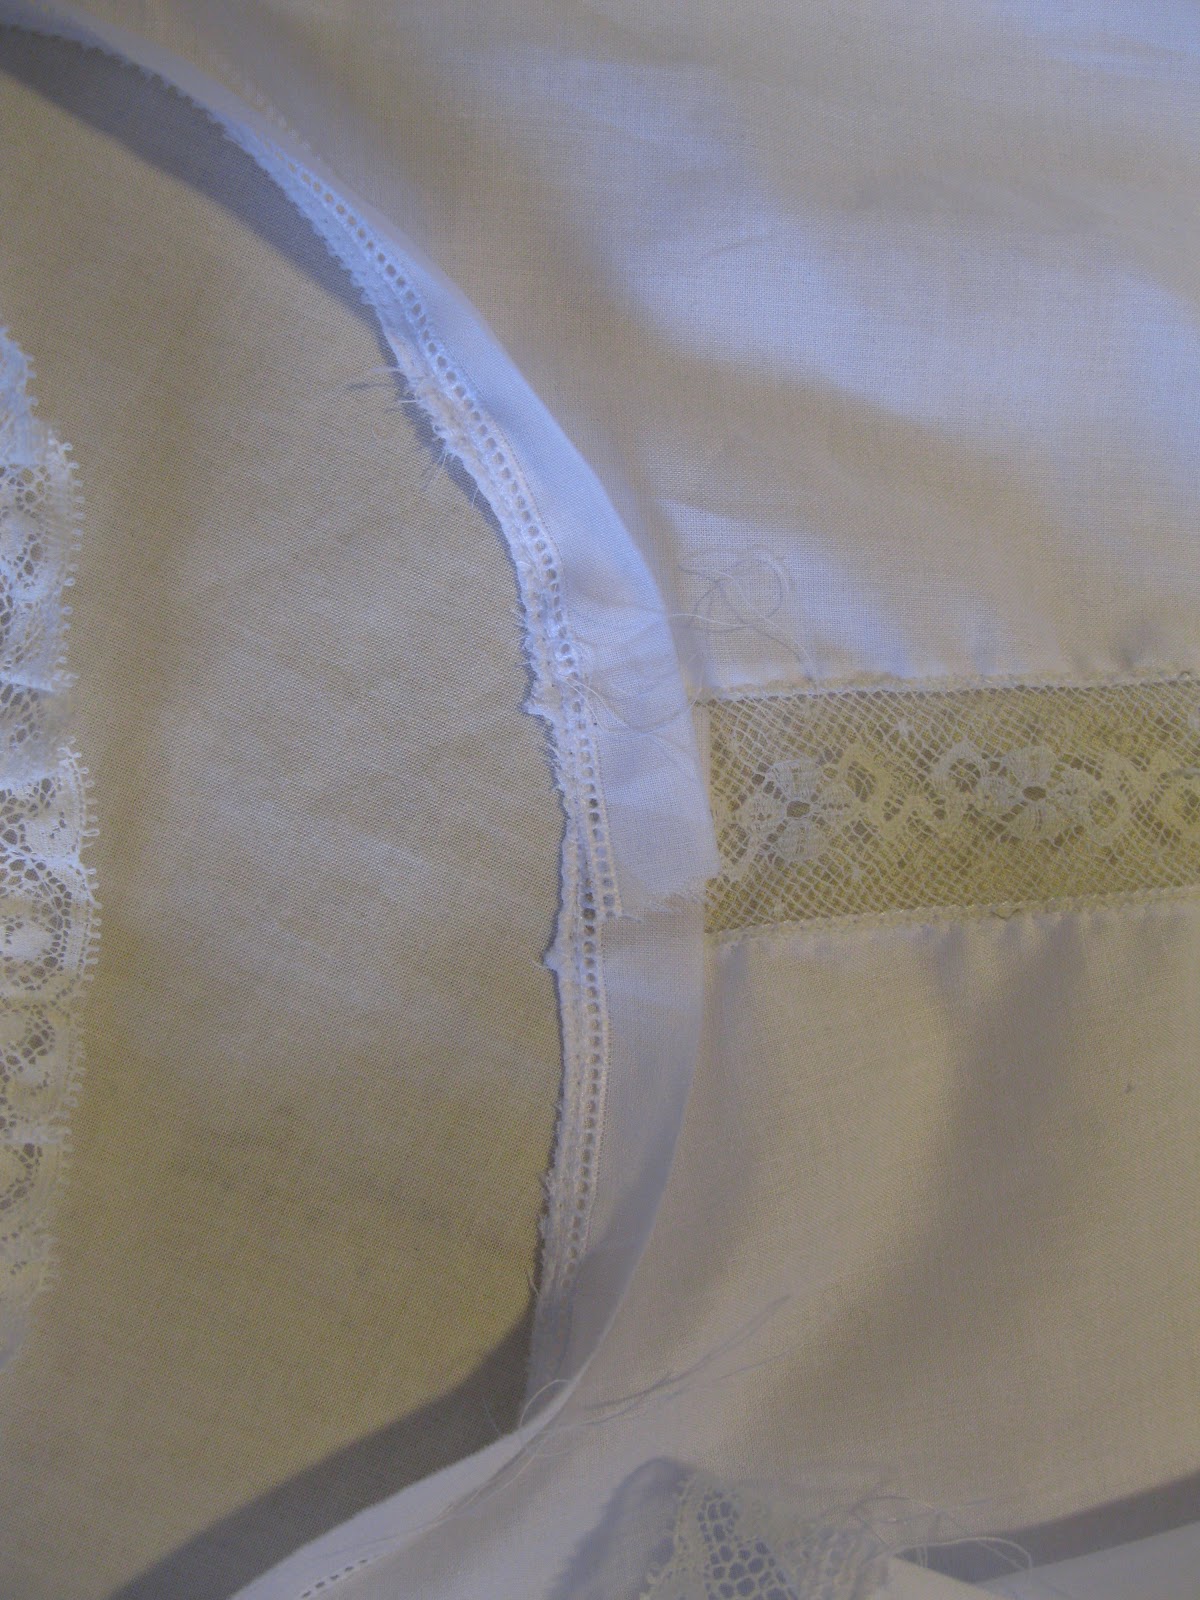
The skirt has a lace band about 2/3 of the way down. I made a paper template of the curve for the piece of lace to be formed to. I traced it with a blue wash out marker--just made little dots--and placed pins on the vertical lace bands to mark their centers. I pinned the lace along the longer edge first and sewed with a straight stitch, then pulled up a thread along the edge of the lace to make it fit into the smaller edge of the curve. Straight stitching again.
After all this sewing, I trimmed the batiste away from the back of the lace and pressed and zigzagged, like I did on the other dress.
At the intersection of each vertical band I had to miter the lace and stitch that, then trim it away on the back. Those seams were covered with small medallions cut out of the lace that's leftover from the bodice. I don't think I got photos of that but I'll check my files. If not, maybe the dress's people will send me the photos they promised from the graduation ceremony.
Next will be photos of the bodice getting connected to the skirt. Enjoy!
Friday, May 13, 2011
Slip


Monday, May 9, 2011
Will it never end?
The rain seems to have stopped for a while, but the flooding from up river is causing lots of problems for many residents here. Creeks and streams are backing up due to snow melt and the long rainy spring in the entire Eastern US. But you most likely know that if you have watched a news report in the last few weeks. And Osama bin Laden is still dead.
The sewing has slowed down, and I'm looking forward to a little break. Just a tiny one, because I hate it when things slow waaay down and I'm broke all summer. What I really want is a decent part time job that I can go to, work at, leave it behind at the end of the shift, and get paid on a regular basis. Dream on.
 I have plenty of photos of the things I've put together these last few months, but need to get them organized and ready for more posts on dress construction. That will have to wait til later this week. But for now here is a photo of the first dress ready to be pressed. Notice my fab cordless iron. It's a Maytag, purchased at the quilt show many years ago. I use it only for pressing these dresses as there's no cord to wrinkle up the parts I just finished unwrinkling. I hate it when that happens!
The sewing has slowed down, and I'm looking forward to a little break. Just a tiny one, because I hate it when things slow waaay down and I'm broke all summer. What I really want is a decent part time job that I can go to, work at, leave it behind at the end of the shift, and get paid on a regular basis. Dream on.

Monday, April 11, 2011
Bizzy (and photo of clematis)
I've been working on the other graduation dress and will start on the third one this week. In addition, I have made progress on the carnival costumes, and am seeing the light at the end of the tunnel on that project. The carnival stuff is interesting and I've been making these suits for over ten years except for a few of them. One of the "kings" went to Prince Charles' tailor one year, at least that's what I heard. It got held up in customs and arrived at a very late hour (or so I was told). Looked pretty good in the photos and I'd really like to know what the invoice on that adventure was.
I have been taking photos of the progress on the graduation dress, but for some reason I haven't on the carnival costume. Maybe I should. When time allows, I will post updates on the dresses. The first one is completed--well--there are a couple of snaps and some pressing left to do, but it is finished and the graduate and her mother really love it.
Soon I will be working on a lovely wedding dress for a friend's daughter. She wants a vintagey type dress and I have some nice lace and some ideas on how to put it together with a very nice piece of cotton/silk lawn from Thai Silks.
 Not much time for art, although I did get some stitching done today on an art quilt that I started in a workshop led by my friend, Vanessa, a few weeks ago. It is from a photo I took in 2007 in Southern California at Crystal Cove. I have many great pictures from that trip. One of them was the subject of my entry into the last chapter of the Journal Quilt Project at the Houston quilt show. Ahh the good old days....
On the personal front, things are not so great. My granddaughter is in trouble, my dear little grandson has disappeared with his mentally unstable mother, and the marriage counselor fired us today.
Good thing I have work to keep me busy.
I have been taking photos of the progress on the graduation dress, but for some reason I haven't on the carnival costume. Maybe I should. When time allows, I will post updates on the dresses. The first one is completed--well--there are a couple of snaps and some pressing left to do, but it is finished and the graduate and her mother really love it.
Soon I will be working on a lovely wedding dress for a friend's daughter. She wants a vintagey type dress and I have some nice lace and some ideas on how to put it together with a very nice piece of cotton/silk lawn from Thai Silks.

On the personal front, things are not so great. My granddaughter is in trouble, my dear little grandson has disappeared with his mentally unstable mother, and the marriage counselor fired us today.
Good thing I have work to keep me busy.
Wednesday, March 30, 2011
Still sewing
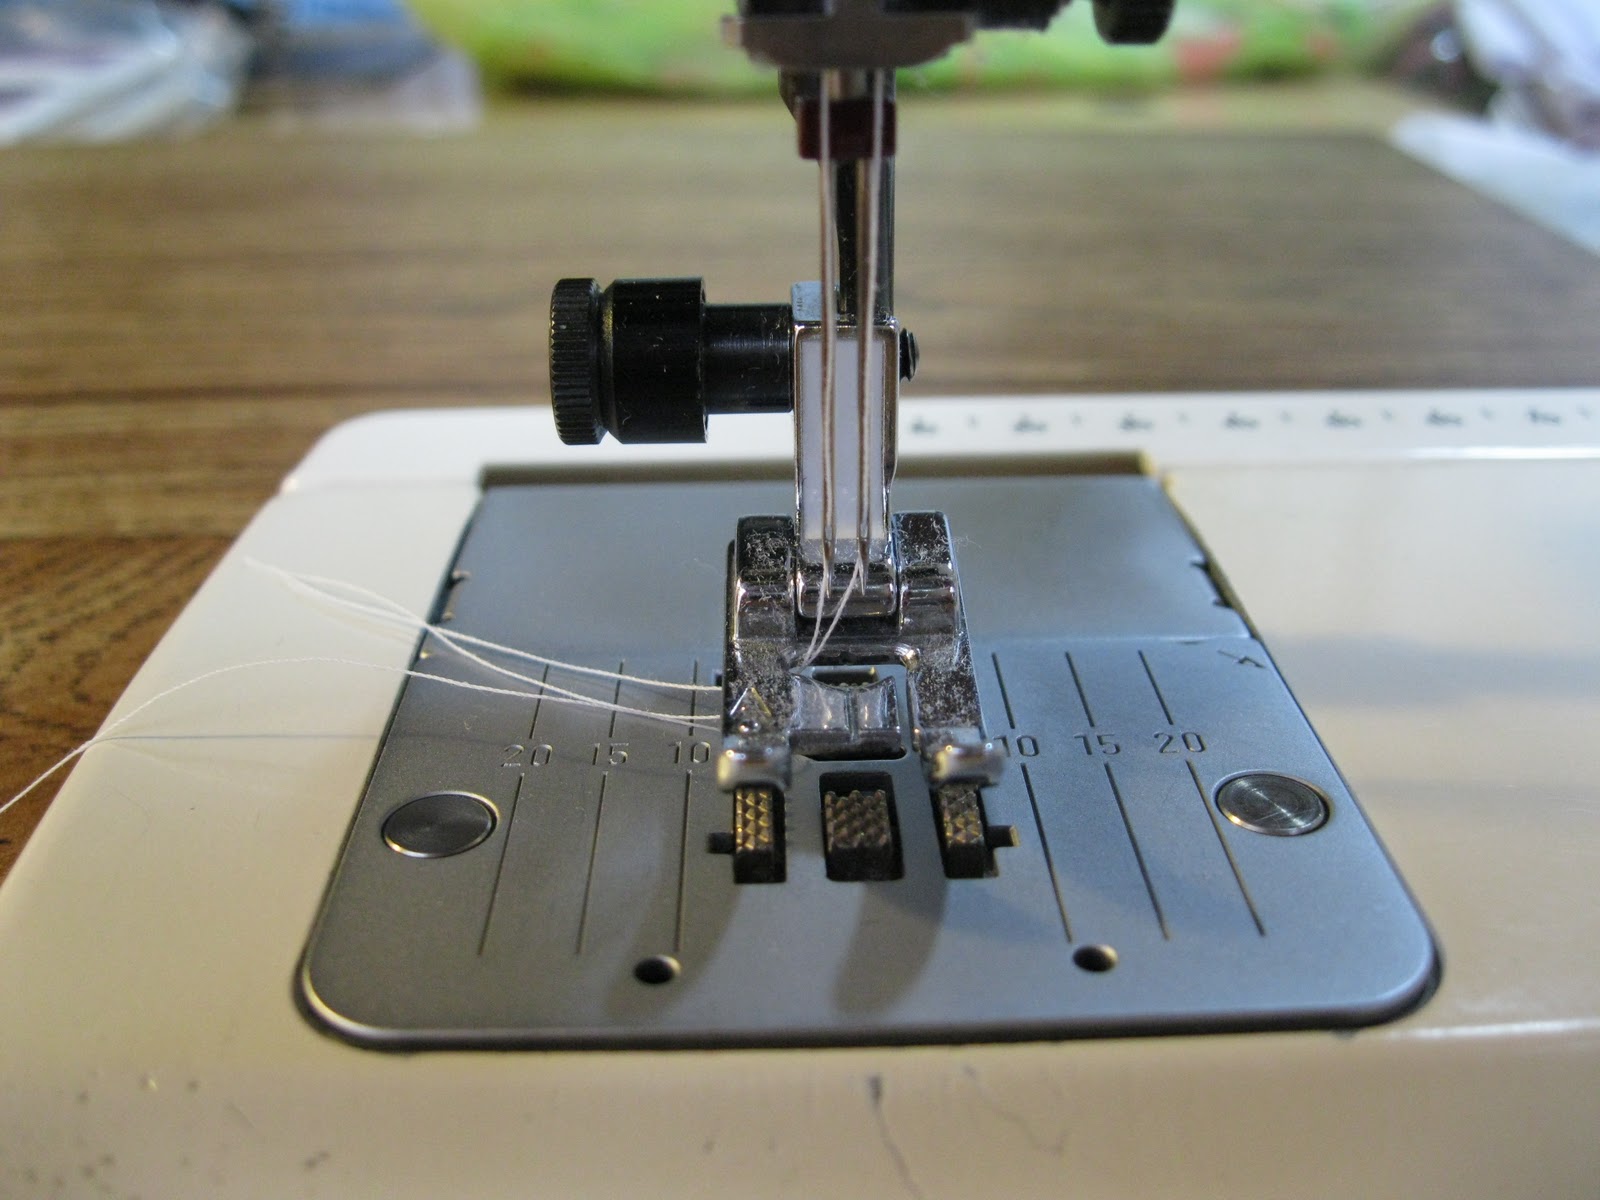
These photos show the set up of the machine for making all the !@#$%^&* tucks. It's not all that difficult, just time consuming and mind numbing. Two threads and a twin needle and my trusty old Elna. You can see the stitch settings a little in the top photo. I've been sewing on this machine since the early '80's.

 The sewing continues, but at a slower pace while my granddaughter is here for her spring break. The first grad dress is finished just needs pressing. The slip to the second dress is done (lovely bias silk crepe) and progress is being made on the dress. Got one of the carnival costumes out and have a close deadline on the other ones, so I will push ahead on that this coming week.

Monday, March 14, 2011
The other graduation dress
There are three dresses in progress at this point in time. A lot of the construction techniques are the same from dress to dress but some of the details vary. On this dress I am using an old dresser scarf for the bodice embellishment. Some of the elements on the scarf are very fragile and I have tried to avoid using them.
The muslin has been fitted and cut apart to make the pattern, which has been in turn cut from Swiss batiste. The lace edges were removed from the scarf and the remaining piece has been basted (by hand,ugh) onto the front bodice. Note it is flat but darts will have to be sewn in to form it into a three dimensional object. The darts are basted in then the rest of the lace is secured to the front bodice by draping it over the edge of the table. The resulting edges will be eased in when the lace is machine sewed to the batiste, which will be trimmed away.
This took a lot of planning, so if anybody I have been around for the last few weeks thought I looked spaced out, this is the reason. I think about this stuff while walking, driving, drinking coffee, drinking wine, drinking beer, watching tv, taking a shower, taking a c**p, reading the newspaper, reading a magazine. Whatever.
If you have any questions, just ask.
The muslin has been fitted and cut apart to make the pattern, which has been in turn cut from Swiss batiste. The lace edges were removed from the scarf and the remaining piece has been basted (by hand,ugh) onto the front bodice. Note it is flat but darts will have to be sewn in to form it into a three dimensional object. The darts are basted in then the rest of the lace is secured to the front bodice by draping it over the edge of the table. The resulting edges will be eased in when the lace is machine sewed to the batiste, which will be trimmed away.
This took a lot of planning, so if anybody I have been around for the last few weeks thought I looked spaced out, this is the reason. I think about this stuff while walking, driving, drinking coffee, drinking wine, drinking beer, watching tv, taking a shower, taking a c**p, reading the newspaper, reading a magazine. Whatever.
 |
| one edge trimmed away |
 |
| basted while flat |
 |
| becoming 3D |
 |
| a little out of sequence, bodice draped over table edge |
Friday, March 11, 2011
Back to the dress
In this episode we will embellish and attach the bottom tier of the dress. I cut the piece of batiste using the pattern I made from the fitting muslin. Vertical tucks were sewn on the center front following the center front crease as a guide. Gentle pressing on the tucks, then I lined up the placement of the next rows of tucks by placing the upper skirt on top of the bottom tier and finger pressing a placement crease. Seven tucks are sewn in each space below the loop design of the upper skirt. There are three bands of vertical tucks on the front and back pieces.
After the tucks are completed, much pinning to attach the skirt pieces together. I used the same technique as I did when inserting the lace on the bodice.
The bodice is basted to the skirt and is waiting for another fitting.
After the tucks are completed, much pinning to attach the skirt pieces together. I used the same technique as I did when inserting the lace on the bodice.
 |
| center panel of tucks |
 |
| finding placement for tucks |
Saturday, March 5, 2011
Sleeves
Yesterday was a very productive day, sewing wise. Finished the loop design on the skirt and started putting the sleeves into the bodice of the graduation dress currently under construction. The sleeves are attached to the bodice with entredeaux. The photos will give a quick tutorial on putting an heirloom garment together with that stuff. I've used the entredeaux to attach the sleeves and also to attach lace edging to the neck line. Most of the other seams have been joined with lace insertion. That gives a fairly strong construction join but the entredeaux is very strong and is good for a seam where strength is important, such as the sleeves to the bodice.
The lace on the lower edge of the sleeve is a combination of two laces which have been zigzagged together. Ribbon will be woven through the holes in the beading--the lace that is between the sleeve and the edging. When the ribbon is pulled up, the sleeve will be slightly gathered by the adjustment.
There are other photos and if anyone needs further elaboration, I will post them upon request.
 |
| Stitched along edge of "holes" |
 |
| extra fabric trimmed away |
 |
| zigzag along trimmed edge to finish |
 |
| Insertion and edging sewn together with zigzag stitch |
 |
| lace sewn to beading then attached to sleeve |
 |
| sleeve sewn to other edge of entredeaux in same manner as before |
There are other photos and if anyone needs further elaboration, I will post them upon request.
Wednesday, March 2, 2011
More sewing and a little walking
There were errands to run this morning and since the weather has turned all spring-like, I went for a walk upon my return. A little lunch, then I hit the sewing machine for more progress on the graduation dress currently under construction. I'm adding the tucked bits into the "loops" design on the skirt. The actual construction had me puzzled for days, but it finally came to me how to get those ovals inside the lace loops without having to do a lot of basting (bleh) or having two layers of fabric in there, which would not contribute to a light airy look and be harder to trim away.
The floral elements from the hankie were added to the tucked ovals first then the fabric trimmed from behind the motif.
Lace was stitched into place on the outer edge with a straight stitch, but I may sew the rest with a zig zag. That way I won't need to turn the edges back, since there isn't a lot of strain on these seams like there is on the upper part of the skirt. The horizontal edges will have to be double stitched though since the bottom of the skirt will be attached there. Sounds complicated but all will be revealed.
Back to the loops. After pinning and stitching the lace across the bottom edge, I pulled up a thread on the lace and tightened it to conform to the inner shape of the oval. A little pressing to persuade it to stay that way. Then I took a deep breath and cut out the inner oval, which is replaced with the tucked bit. Much pinning, then stitching to hold it all in place. A little trimming along the edges of the tucked piece. Whew! One down, five to go.
The photos might be out of sequence with the text, but my sewing skills are far superior to my computer skills. And what's not to love about using your imagination anyway.
Next episode, I will be attaching sleeves to the bodice, which has extra lace now, and entredeaux is involved in that construction phase. Then we will go on to the bottom tier of the skirt. More tucks!!!
The floral elements from the hankie were added to the tucked ovals first then the fabric trimmed from behind the motif.
Lace was stitched into place on the outer edge with a straight stitch, but I may sew the rest with a zig zag. That way I won't need to turn the edges back, since there isn't a lot of strain on these seams like there is on the upper part of the skirt. The horizontal edges will have to be double stitched though since the bottom of the skirt will be attached there. Sounds complicated but all will be revealed.
 |
| lace has been persuaded to conform to an oval shape-ha! |
 |
| pinning before stitching the horizontal bits |
 |
| oval removed-exhale |
 |
| more pins |
 |
| almost done |
 |
| nicely trimmed |
The photos might be out of sequence with the text, but my sewing skills are far superior to my computer skills. And what's not to love about using your imagination anyway.
Next episode, I will be attaching sleeves to the bodice, which has extra lace now, and entredeaux is involved in that construction phase. Then we will go on to the bottom tier of the skirt. More tucks!!!
Friday, February 11, 2011
Graduation dress
Last year I made several posts giving an overview of the construction of a graduation dress. This year I decided to post some examples of the details of one (or two) of the dresses I'm working on. These photos are from a dress that has lots of tucks and a very pretty lace treatment on the skirt. I have already made the muslin, done a fitting and cut it apart for the pattern pieces, which have in turn been cut from Swiss batiste and sewn together.
The tucked pieces of the dress are cut from a panel of batiste that I spent HOURS stitching on with a twin needle. HOURS!
The oblong motifs are cut from an old hankie, then attached with free motion stitching to the tucked piece.
The vertical lace elements are added to the dress with straight stitching, centering the lace over the construction seams. The fabric behind the lace is trimmed away, the trimmed edges are pressed towards the dress and held in place with zig zag stitching.
The "loopy" design was traced onto the batiste skirt with a wash away pen. The lace was stitched on following the tracing. The tucked bit is basted on right now, but will be stitched later after another fitting.
Of course it all is puckered but will be pressed nice and smooth as construction continues and when the dress is finished. If you have any questions, ask away!
The tucked pieces of the dress are cut from a panel of batiste that I spent HOURS stitching on with a twin needle. HOURS!
The oblong motifs are cut from an old hankie, then attached with free motion stitching to the tucked piece.
The vertical lace elements are added to the dress with straight stitching, centering the lace over the construction seams. The fabric behind the lace is trimmed away, the trimmed edges are pressed towards the dress and held in place with zig zag stitching.
 |
| lace centered over seam and straight stitched |
 |
| fabric trimmed |
 |
| fabric being trimmed |
 |
| excess fabric pressed away from lace |
 |
| zig zag on edges |
 |
| part of the tucked panel (HOURS!) |
 |
| motif cut from hankie to be free motioned stitched onto tucked piece |
 |
| loopy design on skirt |
 |
| Bodice with motif and other lace that may or may not be added |
Of course it all is puckered but will be pressed nice and smooth as construction continues and when the dress is finished. If you have any questions, ask away!
Thursday, February 10, 2011
Not Again!!!
It snowed yesterday--a lot!!! And now the temps have dropped to the teens and the city is a solid sheet of ice. Especially the streets. Traffic last evening churned up the precipitation on the pavements and then it all froze overnight. The Sewing Guild meeting has been canceled and I will miss having lunch with the girlz, but the grindstone has been calling my nose and I must heed the request.
The main sewing I'm involved in now is graduation dresses. Last year, I did a series of posts on one dress from start to finish, and decided to do something similar this time but with a more detailed direction. Photos to come later, maybe even this afternoon, depending on how much actual sewing gets done here. The only heat source in my sewing area is a tiny space heater and the forecast doesn't call for balmy temps. We'll be lucky to get to 32 degrees.
The quilt I've been working on for the Quilt Guild challenge has not gone as planned and my heart is just NOT in it. In fact, I am considering taking the whole mess and dumping it in the trash. Of course the guilt of wasting all that fabric and time will haunt me till the end of time. Damn those Lutherans!
Friday, May 21, 2010
Graduation Day


Sunday, April 4, 2010
Graduation dress


This dress is finished--whew!! I took lots of pics of it but depending on how blogger feels today I don't know how many will load. Enjoy.
Monday, March 29, 2010
Graduation dress
More photos of the dress in progress. The graduate came by to try on--final fitting--and I asked permission to show the dress in it's final stages. I don't know why I didn't ask sooner. It suddenly seemed like an invasion of privacy for some reason. But she seemed flattered I was showcasing her dress, so I am relieved now that I have not made a huge mistake starting such a thread as the anatomy of this dress.


Friday, March 19, 2010
Progress


Wednesday, January 20, 2010
Anatomy of a Graduation Dress


In an effort to entertain interested parties, I am documenting the construction of a graduation dress.
These photos are of the fitting muslin and show the neckline and waist seams, drawn in red marker. The muslin has been cut up to be used as a pattern. The original pattern is a McCall's dress with armscythe princess seams. As soon as I can get a decent rendering of the sketch for this dress I will post that, too. The scanner does not want to register pencil drawings.
The main fabric will be Swiss batiste and will be embellished with antique and vintage lace pieces from the graduate's family collection. Stay tuned for further progress on this special garment.
Subscribe to:
Posts (Atom)